Showing posts with label Waytoeducation. Show all posts

How To Find Calculator In Windows 7, Windows 8

Run Calculator With Three Different Ways
You can easily to find out calculator than calculations anything as you need. Now I will discuss three ways to get the calculator.

Open Calculator By Using Windows Search Option
Go to windows search box
➜ Type calc
Now you will get calculator so just click on ‘calculator’ to open this

Open Calculator By Using Run Command
Open Run dialog box
➜ Type calc than click ‘OK’
➜ Press ‘Enter’ on a keyboard to get the calculator.


Open Calculator From Windows System Program
Go to Start
➜ All Programs
➜ Accessories
➜ Calculator

That's all

How To Any Software Run Local User To Administrator User

Any software always running this own local user in Windows XP, Vista, 7, 8 and 10. Much time any software missing complete data and successfully cannot working in windows. So must me open this software with administrator user and get full performance. Now I will discuss how to any software or program open an administrator user.
To open Any Program Run As Administrator User
➜ Just right-click on your software as you want
➜ Select ‘Run as administrator


Now if your administrator user is password protected so type your username and password
➜ Press Enter key on keyboard
That’s all.

How To Free Download 1ST Mass Mailer 2019 Full Version For Windows 10,8,7

1ST Mass Mailer Free Download For PC

1ST Mass Mailer is a fast mass mailer for quickly sent a maximum email. In this video tips you will see how to free download and install 1ST Mass Mailer latest version for your Windows. The 1ST Mass Mailer working on any kind of Windows devices like
Windows 10
Windows 8
Windows 8.1
Windows 7
Windows XP
Windows Vista

1ST Mass Mailer 2019 also support of all Windows 32bit and Windows 64bit operating systems. So friends follow the video tips and download your software. That's all.

How To Free Direct Download Magic Photo Editor 2019 Full Version For PC

Free Download Magic Photo Editor 2019 Latest Version For Windows 10,8,7,XP

Hi friends,
This is Md. Mosharraf Hossain

Magic Photo Editor 2019 full version is the best and free photo editing software for any kind of Windows operating systems like
Windows 10
Windows 8
Windows 8.1
Windows 7
Windows XP
Windows Vista

This is very easy and effective tools to quickly edit and organize any of your personal and professional photo. So If you want to download the latest version of Magic Photo Editor 2019 free version for your PC. you can follow the video tips and easily download your software. The software also support of all Windows 32bit and Windows 64bit operating systems.

Thank you.

How To Free Download Bijoy Bayanno (52 )2019 Free Download Full Download


Hi friends Please the video instruction and easily download the latest version of Bijoy Bayanno 2019 for your PC. The Bijoy 52 working on any kind of Windows devices like
Windows 10
Windows 8
Windows 8.1
Windows 7
Windows XP
Windows Vista

Bijoy Bayanno 2019 also support of all Windows 32bit and Windows 64bit operating systems.
So friends try to follow tips and download your most popular Bangle typing software Bijoy Bayanno 2019 full version for PC.

That's all

How To Free Download and Install Internet Download Manager

At first go to than easily download the latest version of Internet Download Manager software.

How To Free Download and Install Internet Download Manager

After download the software you can follow the bellow tips and install the software.

Step 1: Open the Internet Download Manager (IDM) setup IDM.exe file.

At first double click on the IDM.exe file
Click Next

Step 2: Click Next

Step 3: Now you need to select installation location

Click Next

Step 4: With remaining steps, you just need click Next

Finally, select Finish to finish the setup.

Now your Internet Download Manager installation  will be process of  finishes.

That's OK

You can use 30 full-length free IDM. If you feel you need it, then you can buy Life Time serial number by purchasing it.

Wish you success!

How To Enable Search Option In Windows 7 Start Menu

If you do not find your windows search box on the start menu or in windows explorer. Now follow the bellow lesson to enable or show Widows Search.
Fixed Windows 7 Search Box Missing
Go to Control Panel
➜ Programs and Features

➜ Turn Windows Features on or off
➜ Checked ☑ Windows Search
➜ Click 'OK'
➜ At last click 'Restart Now' to restart your PC.

That's all.

How To Know Which Application Is Using Internet In Windows

What's Using My Internet Bandwidth
If your internet is 3G, 4G package or uses a broadband connection. But your browser is very slow and you cannot know which the programs are decreasing your Internet connection or cut bandwidth data. You can easily to find out all Internet connected programs. Just follow the tips and increase Internet speed at stop unwanted programs.

To See What Programs Are Using Internet Data
➞ Go to Start
➞ All Programs
➞ Accessories
➞ System Tools
➞ Resource Monitor

➞ Now select on ‘Network’
➞ At last click on ‘Top Connections’ to find all online connecting programs.

How To Increase Internet Speed More Than 100% Faster?

Majority Internet users cannot get full speed browsing. Similarly, if your Internet connection is very slow. Please try to our bellow lesson step by steps and successfully complete your windows modify. We hope you will receive 100% 4G Internet speed and very faster browsing.

Get Full Bandwidth Internet Connection Speed

Step 1:

Clean or Flushed The DNS Resolver Cache

Open Command Prompt' (CMD) by administrator user

Now type IPCONFIG /FLUSHDNS and hit Enter key then if get the same bellow message your flushed the DNS Resolver Cache

Step 2:

Reset Winsock NETSH INT IP For Internet Speed Faster

If one week after reset WinSock to get good speed your internet connection
In the command prompt again type NETSH INT IP RESET C:\RESETLOG.txt and hit Enter key. Now like the image below or get the successful message.
Reseting Global, OK!
Reseting Interface, OK!

Step 3:

Show the all Internet slow down process service and aps

With this method, you can show the all Internet slow down service
Launch Run command and type services.MSC and hit Enter key

Stop or Disable Unnecessary Slow Down Service

Now right click on the bellow all net slow down services and update startup type ‘Automatic’ to ‘Manual’ than press Apply and OK
➴Diagnostic Policy Service,
➴Distributed Link Tracking Client,
➴Offline Files,
➴Performance Logs & Alerts,
➴Program Compatibility Assistant Service,
➴Secondary Logon
➴Windows Error Reporting Service,
➴Windows Image Acquisition (WIA)

Find out all unnecessary automatically update program and disable it. For example
➴Adobe Acrobat Update Service

Step 4:

Update Network Card Driver

Old network card driver decreases Internet data. So with this method update your Network card driver for speed up your Internet Bandwidth.

Go to ‘Control Panel’ ➜ Device Manager ➜ Network Adapters ➞ Right click on network card ➞ Select ‘Update Driver Software…’ ➜ click on’ Search automatically for updated driver software’


Step 5:

Disable Your Internet Bandwidth Limitation

It’s the divided into two way.
Way 1-

Disable Your Internet Bandwidth Limitation Using GPMC

Important: If a bandwidth limit is set for a particular network adapter in the registry, this setting is ignored when configuring that network adapter.

Launch Local Group Policy Editor
Go to ‘Local Computer Policy ➞ Computer Configuration ➞ Administrative Templates ➞ Network  ➞QoS Packet Scheduler
Double click on Limit reservable bandwidth
Check ⊙ Enable and Bandwidth limit {%}: 20 to 0 then press OK


Way 2-
Again you type regedit.exe in Run command

Go to HKEY_LOCAL_MACHINE ➞ SOFTWARE ➞ Policies ➞ Microsoft ➞Windows ➞ Psched
Now go to right side and double click on NonBestEffortLimit
Check ‘Decimal’ then value data 1 to 100 and press OK
Close Registry editor

Successfully complete all work at last restart your computer and enjoy 100% Bandwidth internet connection.
Thank you.


How to Find Google Chrome Cache File In Windows?

At first you need to show all hidden file or folders on your computer. So you can easily see Google Chrome Catch.

Show the all hidden files and folders

1. Go to the “Start” button and click on “Control Panel

2. Click on “Folder Options

3. Go to the “View” tab than look under “Advanced Settings

4. Click the “Show Hidden Files and Folders

5. Click "Enter" than press “OK

To Find Out Google Chrome Catch Folder

1.Now go to the run command and type the following patch than hit 'Enter' key' on keyboard.

AppData\Local\Google\Chrome\User Data\Default\Cache

Now you will get all Chrome's cache file in this folder.

How to Find Google Chrome Cache File In Windows, To Find Out Google Chrome Catch Folder

How To Disable or Enable Command Prompt (.cmd and .bat) Using GPO?

CMD means Command Prompt or cmd.exe that was a system program. Its commonly means by command. Any users easily to maintenance his windows anything with the direction of destination any programs. However, if you want to enable and disable your windows command prompt for the local desktop user. Its the very simple to control prevent access of your CMD.

Note: Do not prevent the computer from running batch files if the computer uses logon, logoff, startup, or shutdown batch file scripts, or for users that use Remote Desktop Services.

To Hide And Show Windows Command Prompt

How To Disable or Enable Command Prompt Using GPO

Open Local Group Policy Editor User Configuration

Firstly Open Group Policy Editor
➞ Double click on 'User Configuration' at the right side

Open Local Group Policy Editor User Configuration- gpedit

➞ Go to Administrative Templates
System
➞ In the right side double click on 'Prevent access to the command prompt

To Hide And Show Windows Command Prompt CMD

Useful tips- How To Open Run Command In Windows

Prevent Access To The Command Prompt .cmd and .bat

Now if you want to enable command prompt just select ⊚ Enable or if disable command prompt to set up ⊚ Disable
Apply
OK

Prevent Access To The Command Prompt .cmd and .bat

Now you can use or launch the Windows command prompt like .cmd and .bat
That's all.

How To Open Command Prompt In Windows 10, 8, 7, Vista, XP?

Open Command Prompt By Using Run Command .cmd

With this way, you can open a command prompt in Windows XP, 7, 8 together.

How To Open Command Prompt In Windows 10, 8, 7, Vista, XP

➜ Just Open Run dialog box
➜ Type cmd
➜ Click ‘OK’ or press ‘Enter’ on keyboard
But in this way can not directly open administrator user. Its used only own local user. So you can follow the method two and method third.

Open Command Prompt By Using Run Command

Related tips- How To Disable or Enable Command Prompt Using GPO?

Method 2:

Get Command Prompt By Using Start Menu to run as administrator user

➜ Go to Start menu or click on start icon
➜ All Programs
➜ Accessories
➜ Now right click on Command Prompt to run as administrator user

Get Command Prompt By Using Start Menu

Method 3:

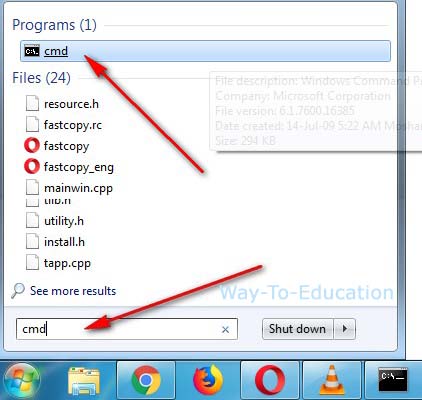
Find Command Prompt From Windows Search Option

Go to windows search box
➜ Type cmd
➜ Right-click on cmd to Command Prompt run as administrator user

Find Command Prompt From Windows Search Option

That's all.

How To Open Group Policy Management Console (GPMC)

The GPMC means Group Policy Management Console. Its actual name of Local Group Policy Editor. Now I will discuss how to open this in your windows.

To Open Local Group Policy Editor In Windows Vista, 7,8

At first open Run command
➜ Type gpedit.msc
➜ Click 'OK' or press Enter key on keyboard
Now you will get the Local Group Policy Editor

To Open Local Group Policy Editor In Windows Vista, 7,8

Useful tips- How To Disable or Enable Command Prompt Using GPO

Launch The Local Group Policy Editor Using MMC snap-in

Now at first open Microsoft Management Console (MMC). So follow the bellow instruction and get MMC for edit or customize Local Group Policy.

Go to Windows search box
➜ Type MMC
➜ Click MMC to open Microsoft Management Console

Launch The Local Group Policy Editor Using MMC snap-in

➜ Press Ctrl M shortcut key on keyboard or click 'File ➜ Add/Remove Snap-in... to adding GPO

How To Open Group Policy Management Console GPMC

Add Windows Group Policy Object (GPO)

Now Double click on 'Group Policy Object...
➜ Click 'Browse...

Add Windows Group Policy Object GPO

➜ Select 'Users
➜ Double click on 'Administrator' or any local user to compatible with Local Group Policy objects.

Add Windows Group Policy Object GPO screen 2


➜ Finish group policy wizard
OK at snap-ins settings page
➜ At last when close console settings must click 'Yes' to save the console.

Add Windows Group Policy Object GPO -screen 3

Now step by step go in Local Computer\Administrator Policy to control your windows uses access.

How To Compress Drive To Save Space In Windows 7,8,10?

If you enable compress content to save disk to get more space your hard disk drive using the NTFS file system. Just follow the bellow lesson to be loaded to access the compressed your PC drive.

Compress Drive To Save Disk Space Using NTFS

Go to ‘My Computer'
Right click on ‘Local Disk C:’
➡ Select ‘Properties’

How To Compress Drive To Save Space In Windows 7,8,10

[A] Select 'General' tab
[B] Checked ☑️ Compress this drive to save disk space
[C] Unchecked ☐ Allow files on the drive to have contents indexed in addition to filing properties
[D] Apply

Compress Drive To Save Disk Space Using NTFS

Compress Hard Drive Windows To Disk Space

Now showing pop-up windows
[A] Checked- ☉Apply changes to drive C:\ only
[B] Unchecked- O Apply changes to drive C:\ subfolders and files
[C] Ok

Compress Hard Drive Windows To Disk Space

That's all & Thanks. You can also get more useful drive compress software automatically speed up your Windows.

Delete Old System Restore Points For Free More Disk Space In Windows

What Is Windows Restore Point?

If you want to be more spaces on your hard drive. When you remove any software or fixing any problem in windows. Your system automatically backup all removal data with windows system restore point. Because feature time you want to this removal date, you can easily to restored all old data from System Restore Point. So decrease your disk spaces at this data. Now I will discuss how to delete or remove all these data files.

Delete Old System Restore Points For Free More Disk Space In Windows

Individually Delete a restore point

➡ Go to ‘My Computer'
➡ Right click on ‘Local Disk C:’
➡ Select ‘Properties’

Individually Delete a restore point

➡ Select 'General' tab
➡ Click 'Disk Cleanup'

Individually Delete a restore point

More tips- How to Delete, Rename, Move Write Protected Any Folder Or Files?

Completely Delete Restore Points Windows

Now get another pop-up page completely remove all old restore backup files.

➡ Select 'More Options'
➡ Click 'Clean up...]
➡ Now get the confirmation window to delete all most recent restore point. So press 'Delete'
➡ Press 'OK'

Completely Delete Restore Points Windows

➡ At last, again you get more popup page to delete permanently and select 'Delete Files'

Delete Old System Restore Points For Free More Disk Space In Windows

That's all. Thank you.

More tips- How To Start PC Boot With "Safe Mode" In Windows Vista/7/8?

How To Enable Run Command In Windows?

Fixed Windows Run Command Is Missing

When you cannot find out your run dialog box on windows. With this way helps to know how to enable and get back to all or specific users. You will be control anything of your windows system files or any program with this run command.

How To Enable Run Command In Windows, Fixed Windows Run Command Is Missing

Useful tips- How to Launch Run Command?

To Enable Windows Run Command

Right click on Start button
➜ Click 'Properties'
To Enable Windows Run Command

➜ Select 'Start Menu'
➜ Customize windows start menu to click 'Customize...

To Enable Windows Run Command -2

➜ Scrolling under and checked ☑ Run command
➜ Press 'OK' to close customization

To Enable Windows Run Command- 3

➜ At last 'Apply'

To Enable Windows Run Command- 4

➜ Finished all work then restart your windows to the visible 'Run' dialog box in the startup menu.

How To Show And Hide Desktop Icons In Windows 7

If you don't like your all icons, folders, programs, shortcut files or anything visible on your windows desktop like a full clean. Its the very simple to hide and show all desktop icons in only one click.

How To Show And Hide Desktop Icons In Windows 7

To Hide Desktop Icons, Shortcut, Anything Right click on desktop any place

➞ Take mouse courser on 'View'
➞ Unchecked ☐ 'Show desktop icons'
That's all.

Useful tips- How To Open Run Command In Windows

To Show/ Unhide Desktop Icons, Shortcut, Anything

Right click on desktop any place
➞ Take mouse courser on 'View'
➞ Checked ☑ 'Show desktop icons'
That's finished.

Useful tips- How To Open Windows Mobility Center In Windows 7

How To Lock, Unlock Or Customize Windows Taskbar

Lock Windows Taskbar

A. Right click on windows taskbar
B. ☑️ Check 'Lock the Taskbar'

Unlock Windows Taskbar

A. Right click on windows taskbar
B. ☐ Uncheck 'Lock the Taskbar'

How To Lock, Unlock Or Customize Windows Taskbar

Customize windows taskbar

Firstly unlock your windows taskbar
Hit your mouse on taskbar top side and drag and drop to customize taskbar.

How To Run Disk Cleanup To Free Up Disk Space?

Free Up Disk Space Windows 10, 7, 8

If your windows are low. You can easily to get more spaces in your hard disk at using disk cleanup without any software. Just deleting any unnecessary files folder such as downloaded program files, temporary internet files, recycle bin, temporary files, thumbnails, system error memory dump files etc. You can also increase PC running speed by using disk cleanup regularly. Just follow the bellow lesson and completely clean your hard disk.

How To Run Disk Cleanup To Free Up Disk Space, how to run disk cleanup windows 8  disk cleanup windows 7  free up disk space windows 7  free up disk space windows 10  disc cleanup windows 10  disk cleanup software  how to free up disk space on windows  disk cleanup command

                More useful tips- Large Size File Convert Into Very Small Size, Reduce File Size

Use Disk Cleanup In Windows

Go to ‘My Computer'
➡ Right click on ‘Local Disk (C:)
➡ Select ‘Properties

Use Disk Cleanup In Windows 10, 8, 7

[A] Select 'General' tab
[B] Click on ‘Disk Cleanup

Free Up Disk Space Windows 10, 7, 8

Delete Unnecessary Files & Junk Files On Windows 10, 8, 7

Now wait sometimes to get cleanup page
[A] Select all files to delete
[B] Click ‘OK
[C] Click ‘Delete Files’ to confirm at permanently delete unnecessary or unwanted files.

Delete Unnecessary Files & Junk Files On Windows

That's all. Thank you.