How To Open Group Policy Management Console (GPMC)

The GPMC means Group Policy Management Console. Its actual name of Local Group Policy Editor. Now I will discuss how to open this in your windows.

To Open Local Group Policy Editor In Windows Vista, 7,8

At first open Run command
➜ Type gpedit.msc
➜ Click 'OK' or press Enter key on keyboard
Now you will get the Local Group Policy Editor

To Open Local Group Policy Editor In Windows Vista, 7,8

Useful tips- How To Disable or Enable Command Prompt Using GPO

Launch The Local Group Policy Editor Using MMC snap-in

Now at first open Microsoft Management Console (MMC). So follow the bellow instruction and get MMC for edit or customize Local Group Policy.

Go to Windows search box
➜ Type MMC
➜ Click MMC to open Microsoft Management Console

Launch The Local Group Policy Editor Using MMC snap-in

➜ Press Ctrl + M shortcut key on keyboard or click 'File ➜ Add/Remove Snap-in... to adding GPO
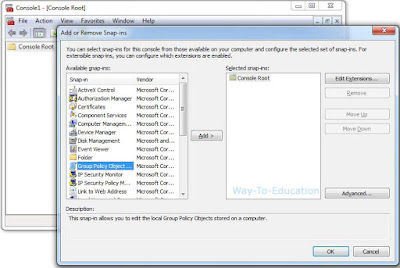
How To Open Group Policy Management Console GPMC

Add Windows Group Policy Object (GPO)

Now Double click on 'Group Policy Object...
➜ Click 'Browse...

Add Windows Group Policy Object GPO

➜ Select 'Users
➜ Double click on 'Administrator' or any local user to compatible with Local Group Policy objects.

Add Windows Group Policy Object GPO screen 2


➜ Finish group policy wizard
➜ OK at snap-ins settings page
➜ At last when close console settings must click 'Yes' to save the console.

Add Windows Group Policy Object GPO -screen 3

Now step by step go in Local Computer\Administrator Policy to control your windows uses access.

How To Compress Drive To Save Space In Windows 7,8,10?

If you enable compress content to save disk to get more space your hard disk drive using the NTFS file system. Just follow the bellow lesson to be loaded to access the compressed your PC drive.

Compress Drive To Save Disk Space Using NTFS

Go to ‘My Computer'
Right click on ‘Local Disk C:’
➡ Select ‘Properties’

How To Compress Drive To Save Space In Windows 7,8,10

[A] Select 'General' tab
[B] Checked ☑️ Compress this drive to save disk space
[C] Unchecked ☐ Allow files on the drive to have contents indexed in addition to filing properties
[D] Apply

Compress Drive To Save Disk Space Using NTFS

Compress Hard Drive Windows To Disk Space

Now showing pop-up windows
[A] Checked- ☉Apply changes to drive C:\ only
[B] Unchecked- O Apply changes to drive C:\ subfolders and files
[C] Ok

Compress Hard Drive Windows To Disk Space

That's all & Thanks. You can also get more useful drive compress software automatically speed up your Windows.

Delete Old System Restore Points For Free More Disk Space In Windows

What Is Windows Restore Point?

If you want to be more spaces on your hard drive. When you remove any software or fixing any problem in windows. Your system automatically backup all removal data with windows system restore point. Because feature time you want to this removal date, you can easily to restored all old data from System Restore Point. So decrease your disk spaces at this data. Now I will discuss how to delete or remove all these data files.

Delete Old System Restore Points For Free More Disk Space In Windows

Individually Delete a restore point

➡ Go to ‘My Computer'
➡ Right click on ‘Local Disk C:’
➡ Select ‘Properties’

Individually Delete a restore point

➡ Select 'General' tab
➡ Click 'Disk Cleanup'

Individually Delete a restore point

More tips- How to Delete, Rename, Move Write Protected Any Folder Or Files?

Completely Delete Restore Points Windows

Now get another pop-up page completely remove all old restore backup files.

➡ Select 'More Options'
➡ Click 'Clean up...]
➡ Now get the confirmation window to delete all most recent restore point. So press 'Delete'
➡ Press 'OK'

Completely Delete Restore Points Windows

➡ At last, again you get more popup page to delete permanently and select 'Delete Files'

Delete Old System Restore Points For Free More Disk Space In Windows

That's all. Thank you.

More tips- How To Start PC Boot With "Safe Mode" In Windows Vista/7/8?

How To Enable Run Command In Windows?

Fixed Windows Run Command Is Missing

When you cannot find out your run dialog box on windows. With this way helps to know how to enable and get back to all or specific users. You will be control anything of your windows system files or any program with this run command.

How To Enable Run Command In Windows, Fixed Windows Run Command Is Missing

Useful tips- How to Launch Run Command?

To Enable Windows Run Command

Right click on Start button
➜ Click 'Properties'
To Enable Windows Run Command

➜ Select 'Start Menu'
➜ Customize windows start menu to click 'Customize...

To Enable Windows Run Command -2

➜ Scrolling under and checked ☑ Run command
➜ Press 'OK' to close customization

To Enable Windows Run Command- 3

➜ At last 'Apply'

To Enable Windows Run Command- 4

➜ Finished all work then restart your windows to the visible 'Run' dialog box in the startup menu.

How To Show And Hide Desktop Icons In Windows 7

If you don't like your all icons, folders, programs, shortcut files or anything visible on your windows desktop like a full clean. Its the very simple to hide and show all desktop icons in only one click.

How To Show And Hide Desktop Icons In Windows 7

To Hide Desktop Icons, Shortcut, Anything Right click on desktop any place

➞ Take mouse courser on 'View'
➞ Unchecked ☐ 'Show desktop icons'
That's all.

Useful tips- How To Open Run Command In Windows

To Show/ Unhide Desktop Icons, Shortcut, Anything

Right click on desktop any place
➞ Take mouse courser on 'View'
➞ Checked ☑ 'Show desktop icons'
That's finished.

Useful tips- How To Open Windows Mobility Center In Windows 7

How To Lock, Unlock Or Customize Windows Taskbar

Lock Windows Taskbar

A. Right click on windows taskbar
B. ☑️ Check 'Lock the Taskbar'

Unlock Windows Taskbar

A. Right click on windows taskbar
B. ☐ Uncheck 'Lock the Taskbar'

How To Lock, Unlock Or Customize Windows Taskbar

Customize windows taskbar

Firstly unlock your windows taskbar
Hit your mouse on taskbar top side and drag and drop to customize taskbar.

How To Run Disk Cleanup To Free Up Disk Space?

Free Up Disk Space Windows 10, 7, 8

If your windows are low. You can easily to get more spaces in your hard disk at using disk cleanup without any software. Just deleting any unnecessary files folder such as downloaded program files, temporary internet files, recycle bin, temporary files, thumbnails, system error memory dump files etc. You can also increase PC running speed by using disk cleanup regularly. Just follow the bellow lesson and completely clean your hard disk.

How To Run Disk Cleanup To Free Up Disk Space, how to run disk cleanup windows 8  disk cleanup windows 7  free up disk space windows 7  free up disk space windows 10  disc cleanup windows 10  disk cleanup software  how to free up disk space on windows  disk cleanup command

                More useful tips- Large Size File Convert Into Very Small Size, Reduce File Size

Use Disk Cleanup In Windows

Go to ‘My Computer'
➡ Right click on ‘Local Disk (C:)’
➡ Select ‘Properties’

Use Disk Cleanup In Windows 10, 8, 7

[A] Select 'General' tab
[B] Click on ‘Disk Cleanup’

Free Up Disk Space Windows 10, 7, 8

Delete Unnecessary Files & Junk Files On Windows 10, 8, 7

Now wait sometimes to get cleanup page
[A] Select all files to delete
[B] Click ‘OK’
[C] Click ‘Delete Files’ to confirm at permanently delete unnecessary or unwanted files.

Delete Unnecessary Files & Junk Files On Windows

That's all. Thank you.

How To Activate Magic Photo Editor Software?

Make full version Magic Photo Editor Software

Step 1:
At first download Magic Photo Editor.
Go to Magic Photo Editor’ software package folder and copy 'MagicPhoto' crack file

How To Activate Magic Photo Editor Software

          Recommended: How To Download And Install Magic Photo Editor Software?

Step 2:
   [A] Now go to Magic Photo Editor' installation location (C:\Program Files\Magic Photo Editor)
   [B] Past 'MagicPhoto' crack file
   [C] Replace with copy

Make full version Magic Photo Editor Software

If your problem for administrator user please click "Continue"

How To Activate Magic Photo Editor Software

That’s all. Now your Magic Photo Editor graphics program is fully activated.

Magic Photo Editor Software activator, patch, keygen

Thank you.

      More useful tips- What Apps Are Running In The Background Windows? Show & Stop

How To Download And Install Magic Photo Editor Software?

Magic Photo Editor Free Download

  • Firstly download Magic Photo Editor Latest Version
  • Now open or unzip this software with WinRar program- ( details tips here)
  • Disconnected internet connection

To Install Magic Photo Editor Software

Now run ‘Mpe Setup’ .exe software
  • Next >
  • Next >
  • Next >
  • Next >
  • Install >
  • Unchecked ☐ Launch Magic Photo Editor
At last click ‘Finish’

How To Download And Install Magic Photo Editor Software

How to Open Firefox Tools, Options, Preferences, Config Settings Page?

With The Best Settings Of Mozilla Firefox

How to Open Firefox Tools, Options, Preferences, Config Settings Page, firefox option menu

Firefox Configuration Edit With about: preferences

You can easily configuration Firefox complete setting to customize your own choice. To change Firefox accessibility, privacy, browsing, network, application, updates, and other advanced settings that get a new version Mozilla Firefox. Here I will share how to customize your Firefox web browser.

Settings For Firefox Privacy, Download, History, Add-ONS, Search Engine

Settings For Firefox Privacy, Download, History, Add-ONS, Search Engine, Firefox Configuration Edit With about: preferences
  • Type about: preferences in Mozilla Firefox than hit enter
  • Now display the Firefox main settings.
Here I will describe all of Mozilla Firefox setting or config information.

         Recommended: How To Reset Opera Browser Complete Settings?

Mozilla General Settings:

Customize default browser startup link, Firefox download Location and customize your Firefox browser tab.

Firefox Search Settings:

Here search suggestions for your default search engine.

Firefox Content Settings:

Here you can customize your DRM content, notification, pop-ups, fonts & color, and language.

Firefox Applications Settings:

Here customizing your application while using in Firefox.

Firefox Privacy Settings:

When browsing Mozilla Firefox you can track, history and location bar change with this place.

Firefox Security Settings:

You can maintain Firefox security to save or un-save your all password while you log in any websites.

Firefox Sync Settings:

With the settings, you change synchronize your bookmarks, history, tabs, passwords, add-ons, and preferences across all your devices.

Firefox Advanced Settings:

Mozilla provides a Firefox best general advanced settings, data choices, network connection settings, Firefox update, Firefox certification.

Large Size File Convert Into Very Small Size, Reduce File Size

Compress Big File Into Smallest Size

You can easily to convert any big size files or software convert into very small or minimum size to follow this lesson. WinRAR is the best compressing or file size converter software. With this software, you can easily to create any big size file or highly compressed software mean converted to very small size.

Big Size File Convert Into Very Small Size, Reduce File Size, Compress Big File Into Smallest Size with winrar

Compress Large Files To Small Size With WinRAR

Firstly you need to download original version WinRAR software then successfully installed on your PC.
  • WinRAR Software Final Full Version Download

To Highly Compress Files Using WinRar

Now follow the bellow lesson step by step and compress a files or folder to a smaller size

Step 1:
[A] Select your complete files and click right button on selected files
[B] Click Add to archive… on the drop-down menu

big video file to small video file converter  how to compress large files to small size with winrar  how to compress large files to smaller size using winrar  how to compress 3gb to 10mb using winrar

Step 2:
 [A] Archive format, compression method, archiving options select as your choice
 [B] Press “OK” to get your file converted to .rar compressed file in the same folder

how to compress 3gb to 10mb using winrar  how to compress large files to smaller size using winrar  how to compress large files to small size  kgb-file-archiver-download  how to compress a folder to a smaller size  how to compress 1gb to 1mb using winrar  how to compress large video files to small size  compress zip file smaller

That’s all.
Thanks a lot

WinRAR software related tips:
↘ What Is BIOS Computer? BIOS Definition, How Does BIOS Work?
↘ What Is IP Address? Know About IP Addresses

How To Use Mozilla Firefox Private Browsing With More Tracking Protection?

How To Use Mozilla Firefox Private Browsing with Tracking Protection, Enable Firefox New Private Browsing Mode

Enable Firefox New Private Browsing Mode

While you browse any web pages in Mozilla Firefox Private Browsing with Tracking Protection, Firefox cannot track any visited pages, search history, temporary files and any cookies files. So you fully safe browse in this protection service. But any employer tracking your information Firefox automatically block your employers.

Open a Firefox New Private Browsing Window

Now I will share how to protect your browsing with Firefox Tracking Protection
  • Run Mozilla Firefox

Firefox private browsing shortcut

  • Just press Ctrl+Shift+P shortcut key
  • Now you will get your private browsing window.

How to Turn On Firefox Private Browsing

If you need to start or stop this protection service firstly open New Private Browsing Window then you can click on ‘Tracking Protection’

How to Turn On Firefox Private Browsing, How to Enable Private Browsing in Mozilla Firefox

Get Firefox Private Browsing Window alternative tips

Run Mozilla Firefox
[A] Just click on ‘Open menu’ tab at top right sidebar
[B] Select ‘New Private Window’ and open your new protection service window.

Get Firefox Private Browsing Window alternative tips, How can make create a Private Browsing in mozilla firefox window

That's all.

How To Reset Opera Browser Complete Settings?

How To Reset Opera Browser Complete Settings, Reset Opera Browser to Default Settings

Reset Opera Browser default Settings

You can easily to restore your Opera web browser in a simple way. Just follow the bellow tips and reset latest version Opera browser.

Step 1- Find Opera browser complete information

[A] Run Opera browser and type opera://about in address bar then hit Enter key
[B] Now you will see complete about Opera browser complete information and copy or note the Paths- Profile and Cache location text
C:\Users\Mosharraf\AppData\Roaming\Opera Software\Opera Stable
C:\Users\Mosharraf\AppData\Local\Opera Software\Opera Stable

Here blue color Mosharraf is my username.

Find Opera browser complete information

Now exit your Opera browser then go to this location and delete two folders

Step 2- Delete Opera Profile and Cache folders For Default Settings

  • Open ‘Run’ command
  • Firstly type Profile location without Opera Stable in command box then hit Enter
Delete Opera Profile and Cache folders For Default Settings
  • Now you will see Opera Stable folder. Ok just delete this folder
see Opera Stable folder
  • Second again open ‘Run’ command and type cache location without Opera Stable in command box then hit Enter
Opera Stable in command box
  • Now you will see other Opera Stable folder. Ok just also delete this folder
see other Opera Stable folder

That’s all
Now your Opera browser is liked new.